INSERT ALTERNATIVE TEXT FOR YOUR HEADER IMAGE HERE

Friday, December 16, 2011

Shameless copying!

I hold my hands up and say that last Saturday while at our all day crop - my friend made a set of these and I was enthralled....  On Sunday while out food shopping I strolled by the yogurt aisle and found some little jars of layered yogurt and bought 3!  (should have bought 6 LOL!).


My home decor this year is this teal shade, so I selected some MME papers (swoon!) and some Crate Paper stickers.  The felt was cut with my BigShot and added some twine - Simples!

I LOVE THEM!!!  Can't wait to light them up!

Really this is just a form of recycling!  So let's all eat lots of yogurts in glass jars and make something with them!!!!!

Monday, December 12, 2011

Christmas is HARD work!

Every year I start with great intentions.  Start shopping early, start wrapping as I go, make and freeze what I can and even start buying the non-perishable groceries in advance.  I plan the made gifts, and try and have them ready before the start of December...  Every year I have a huge panic attack that I won't be ready, that I have forgotten something huge (and generally have) and this makes the last 2 weeks stressful.

This year, I did all the above planning, and here I am in the last 2 weeks still in the same state!  What does that teach me - well no matter what I have done, or plan to get done early, the last 2 weeks are HARD work and nothing you do can make it any easier!

So out come the lists - divide my nights out to complete one task, and make the time work for me.  I am so glad that the X-Factor is over cause I just could not waste another hour on the couch watching it.  My Saturday and Sunday nights were just taken over with TV and not crafting.

Here is a card that I made for the Crafty Bloggers Challenge blog - I love the simple design of it,


The papers and ribbon were left over and sitting on my desk from the kit I got from Handmade Hannah, and I had the leaf punch out for another project.  So the card just fell into place.  The little birdie is from a Myra Road set, and I inked it and covered it with Glossy Accents.  The NOEL was from a Making Memories Alpha set.


See the little leaves sit up and surround the ribbon, but after being squashed in an envelope it won't look like that!

I have a lovely project I want to share with you, but just waiting on a quiet moment to photograph it and post it here.

My new motto will be Stress Less, do More!

Thursday, December 8, 2011

Making Memories (for me!)

Way back in August I received a message to ask me if I would be interested in doing a guest design spot for Making Memories!  OMG I did not have to think twice about that one, and I replied with as much reserve as I could muster,"Yes, that would be great!"  Translation - OMG OMG OMG YES YES YES!!! Can't breath!,  Jump around, run around, and then try and explain it my family who say...."Is that good?"

So it's been ages, the projects have been hanging in my home since September but here you go....

This is the link for my guest spot - and I am a tad excited, but not too happy with the photos, as they don't really do either project justice, but the light is cruel in this part of the world in the winter.


http://blog.makingmemories.com/2011/12/guest-designer-michelle-la-grue-.html

Tuesday, December 6, 2011

Must be rusty!

For the last week it has been one thing or another that prevented me from getting to my craft room.  There was a card on the desk half made for nearly 10 days and by the time I finished it, the reason for making it was gone!

So I FORCED myself out the office last night, and had a fab creative time....  These cards fell into place....


This card was one I did not expect to have to make.  I had just made one for a lovely older gentleman who died and just over 3 weeks later his wife suddenly died, and this has been devastating for the family as she was a very robust, lively woman.  The card will go in the post tomorrow.  A doily coloured black, one of the new EK success flower punch flowers, and PTI die cut and PTI stamped sentiment.  The patterned paper is a small bit left over from the Handmade Hannah Christmas kit, that worked perfectly.


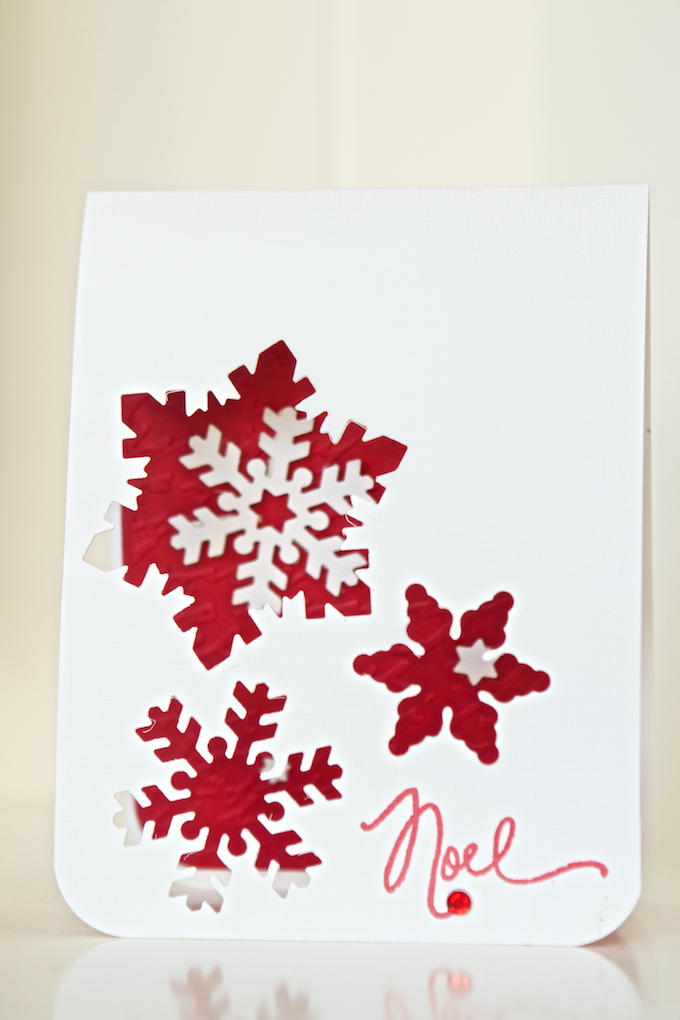
This card is really lovely in the hand, but hard to photograph.  I use my fav Spellbinders Die's to cut the snowflake apertures, and then layered some more white snowflake die cuts on the inside of the card and the red background is embossed. The card is simple, but very effective.  The best way to probably show you it, is to lay it flat.....


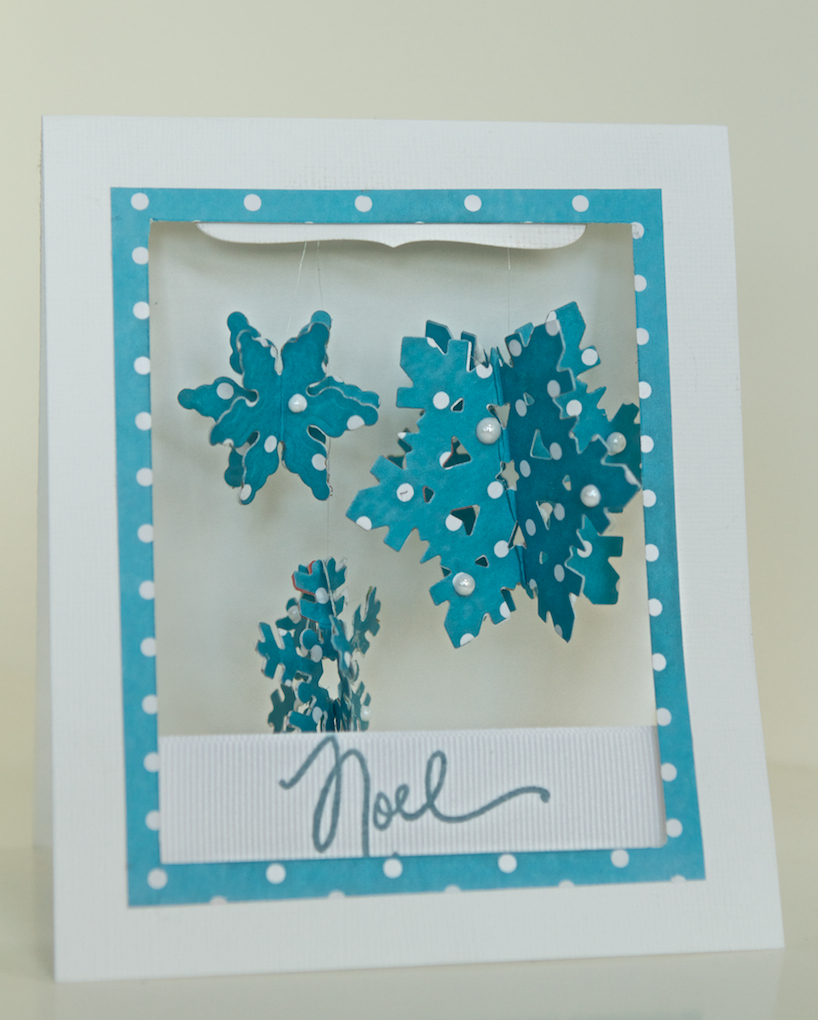
My final card tonight is one that I loved, it was super fiddly, but I was so happy with it all the way till the end, when I suddenly felt it didn't look like what I wanted it to look like. That's what I get for leaving it sitting for nearly 10 days.  It was a card made with a challenge in mind, but as I ran out of time, I can show it here!


I know I am using the same die again!!! BUT really this is the only time of year I can get to use it and OMG it just oozes fabulous!!!!!

I cut loads of the snowflakes and glued them into a 3d shape and ran a thin nylon string thru the middle and suspended it on the top of the card.  Added a few white gems and ta-daaaa!  Instant hanging snowflakes!!!  LOVE it, but not sure of the final impact...  Probably nicer in my head!


So that's it, one night's work, 1made from start to end, and 2 finished, more nights like that would be great.

Back soon with news!!!!

Thursday, December 1, 2011

The Special Paper!

I know that in all the craft rooms out there, each one of us has a favorite line or favorite paper!  Over the years I can think of 2 or 3 that I just adored and would buy more sheets than I could ever use if I found them and the Pink Paislee line called Tinsel Town Collection is one of them.

This range is about 3 yrs old and I think it was their first Christmas range, but from the first use I have loved it and have a small amount of it left.  To be honest, purple, pink and green are not the most Christmasssy colours, but they work for me!


So this is my version of a Tussie Mussie, which is a cone shaped holder, normally used to hold flowers.  But this time I used it to hold a lovely pink / purple lollypop and this could live on your Christmas tree with a little bit of Ribbon.

The papers and label are all Pink Paislee, and the flower is made from the pink tissue paper and some leaves punched from spare paper.  The swirls are from a die borrowed at the last crop and I think it might be one of my next purchases.  I found the lollypop in my local supermarket (Tesco) and noticed the colour was perfect for the papers, and then had to hide it from the kids when I got  home.


Loved how this turned out, makes me want to make more!

Monday, November 28, 2011

Notice anything different?

A few "nice" things have happened to me recently, crafty and photograpy things that put a smile on my face.  The first thing that happened was being asked by Making Memories to design for them for a special they are doing on their blog in December and I will be featured on the 7th December! 

The second thing was strange - I got an email that I actually thought was a joke, from a personal email address asking me about a photo of mine and a Layout.  The photo did not show up on the email and I had to guess which one it was.  So I am very surprised and delighted to tell you that my photo will be published in a Creating Keepsakes Magazine in May 2012 and my Layout will be used on their website.  Not sure how this happened, as they found me, I didn't submit to them!

I have just taken the photo down from my blog and added a lovely new picture in it's place!!!!


On Nov 22, 2011, at 2:56 AM, Michelle La Grue wrote:


Monday, November 21, 2011

DT Challenge card.....

We had a challenge to work from a sketch, and I found this fab sketch on line and set the DT the challenge to work with it.

This card was made at my local monthly Saturday crop - and I had to make it from memory as I forgot to bring the sketch with me! Doh!!!


Again using my PTI stamps and the flower die - I probably should give it a little break as I might wear it out!  Love the colour combo I used here, very uplifting and feels like a happy card to me!

More from Hannah's Fab Kit

It was lovely on Saturday to hear all the kits arriving at crafters homes.  I had a little time on the weekend to do a bit of crafting and I used the left overs of the kit to make these little pieces.

Hold me back as I could just keep playing with my Spellbinders Snowflake Die!  OMG I  just love it and fingers are itching to buy the other version of this die.


This long thin card is perfect to showcase the papers and the snowflakes,  cut them in white then coloured them with a cream paint dabber and covered them with stickles.


I only had 1 tag left!  So I cut 2 apertures with the snowflake die and stamped the sentiment on the end.  The apertures were backed with patterned paper and then a bit of red stickles added.  I had a small amount of ribbon left and then die cut some white fabric (from the new padding from my ironing board!) and added it to the top of the tag with a brad.


Shot of the layered snowflake.  Enjoy your kits girls!

Saturday, November 19, 2011

Sweet & Simple


The new Lost & Found II, Blush is probably my favorite collection of the year.  (Might have already said that!).  I only had 1 sheet of the paper below, and typically I made a botch of the card and tried to rescue it and the card below is the rescued version.  

Using my PTI stamp, I layered it up and added some offcuts and made a quick and easy card.  Which is winging it away to the intended as I type.


The second card is using the same set of PTI stamps, but for a sad reason.  The death of my friends father in law.  Paper is from Pink Paislee (I think?) and the flower is PTI, layered flower which is one of my favorites right now.


I have a few Challenge cards to share from the Crafty Bloggers Challenge Blog, and I can share them with you in a few days.

Keep well!  Michelle

Thursday, November 17, 2011

In our house - We Believe!!!

My christmas grab box arrived from Hannah the other day and I was immediately in love with the classy colours and papers in the box.  I love how Hannah and Katherine both have such different ways of using the box contents, when I opened the box I immediately wanted to use the tags as a count down for Christmas and at the start, this is what I was going to do.  Then as I was looking and starting to work with the papers I found myself going in a different directly.

Oh NO!..... Yucky photo!! Here are some close up's of the details.....


Here is the garland in place in my living room - where it looks lovely.


There is so much left in the kit that I could make a Layout!  Wow - been a awhile since I made one of them!!!  Hope you like my submission for the DT - Sorry it is a little late, I had a mini crisis with a border punch that delayed my finishing of it.  

Monday, November 14, 2011

2 BIrthday Cards

My mother in law recently celebrated her Birthday.  The day before.  I had just received a set of Nestabilities dies that I bought from Hannah.  The dies were on my list of wants, and was delighted to get them as when you want something, you always get ideas of what to do with the item when you get it.


The papers are mainly Crate Paper, Portrait collection, with a rogue sheet of Girls Paperie (dotty!) added in to make it pop!  The sentiment and journal tag are both stamped.  The whole card has been stitched over in black (labour of love!).

The next card was a quick and simple card for my boss who also celebrated his Birthday while he was working here in Dublin.  He got to take myself and my DH out for dinner!  So the least I could do is make him a card and buy him a pint!


So photo taken last minute before I ran out the door, but you get the idea, it's not a full red, it's, more muted.  Teresa Collins stamp and not sure who made the ticket.

More to come, just going to add them now to blogger for scheduled posting - so keep coming back!  Have a fab new kit on my desk from Hannah - just waiting for time to play with it!!!!

Tuesday, November 8, 2011

I am in the Christmas mood!

Since late September I have been working on Christmas project.  Some project for Making Memories (yah me!!) which will be up on their blog on 7th December.  To get inspiration I spent a lot of time looking around Pinterest..... It is just amazing!  My guilty pleasure - and I just do a happy dance inside when I see all the fab projects and photos.  Makes me want to try everything and stop and photograph everything.

Somewhere I saw a little tree - I could not find a tutorial for it, but just sat and played with some paper till I worked it out.  I've added a collage of 9 photos showing what I did - photos are dark but you get the idea.

1. Cut a circle, I used my MS circle cutter.
2. Add some glue to the back of the circle
3. Glue the circle into a half circle.
4. Ink the edges.
5. Manipulate the paper so it's easy to fold (breaking the tension on the paper)
6. With half circle in front of you with straight edge on the right, fold it over itself from left to right.
7. Use a foam dot or glue to hold this in place when your happy, and then pull the top part into place.
8. Add second foam dot to hold top part in place.
9. I love dimension, so you can see that I have this in 3D, but it looks great flat too!


So there ya all go!  Go forth and make trees!!!!

Monday, November 7, 2011

Special Cake for a special Girl!


Tomorrow my beautiful darling daughter Caoimhe will be 15!  I know all mums say that their daughters are beautiful, but I think my Caoimhe is just amazing.  She is a lovely big sister, a real friend and I am proud to call her my daughter.

At 15, money is her "God" at the moment, so all she wants for her present is Money, but she has already gotten me to buy her some Urban Decay makeup, and new jammies and slippers from her little sisters.  She has plans to hit Dundrum Shopping Center with her friend Megan and shop shop shop!  She wants to have a good look in Hollister and might just spend most of her money there.  She wants another new phone, despite her phone being only 6 months old!!!

We are not planning any big parties anymore for her, as she really did nearly everything that could be done in the past.  So she was just having friends over and a sleep over, but I arranged for a cake for her.  Caoimhe is makeup mad!  She loves it - wants it all and has a list as long as her arm of all the items she must have.  In the future I think she might be interested in a career or side line in makeup!  My next door neighbour Karyn Sheridan and her boyfriend Neil Hassett are the most amazing Designer Bakers and they are called What's up Cupcake?  I had a quick chat to Karyn about the cake and this is what she came up with.  We cannot wait to taste the cake but I if it tastes half as good as it looks, it will be demolished in a day!


So if you have any occasions that require cakes, cupcakes or even cake pops, give Karyn or Neil a call and say Michelle sent you or visit them on Facebook!

This is another one of Karyns cakes - Just stunning!!!

http://www.facebook.com/pages/Whats-up-Cupcake/152920341425605

Saturday, November 5, 2011

Crafty Bloggers DT

In the hopes that I can find some inspiration, I have joined a Crafty Bloggers Design Team.  This group started out on FB and now has about 450 members on Facebook.

There were some glitches and I missed the first challenge, but I've finally gotten my act together and made a card for the second challenge.

Come and have a look at what we are doing.....


The prompt was Purple, Green and Pink.....  I only used scraps from my scrap bag for this card, and the stamp is PTI, along with the flower die.

Wednesday, November 2, 2011

Not feeling it!

I have to admit that I am not in the crafty zone at the moment.  The craft room is tidy, the stash is sitting there, the mojo has gone on a hike!!  I feel like I have lost my right arm, the body is willing but the mojo is weak!!!

I may have just asked too much of it recently - I got asked by one of the bigger scrapbook manufacturers to work with some of their products and after I had finished the bunting and the star for Handmade Hannah, I then jumped into the papers and embellishment pack from this company.  I was so inspired, really had fun and pushed my creativity to it's limit and was really happy with what I made.  Once it was uploaded and done and dusted, I slumped into this mood and the last few things I made have ho hum and not worth photographing and uploading.

So it's nothing from me today - some stuff on my DH's computer that I need to move to mine, and a few new things that I made might make it to the blog once I have looked at them again.

So I may give it some time, take a few challenges and see what happens.

The two small's at the Pumpkin Festival in Virginia Co Cavan at the weekend.


Tuesday, October 18, 2011

Something old.....


This project has been sitting in my craft room for ages.  In fact, I really had forgotten about it, and only went looking for a specific photo for camera club and found these photos.

The frame was bought at a car boot sale for €1.00 and it was in a state.  There was a horrible picture inside and the frame was bashed up.  So I covered the black frame in some Acrylic Paint (Adirondac Dabber - Pool) and distressed it when it was dry.


I treated each little square as a scrapbook mini page - Hope you like it, I originally planned to give it away, but I really like it and may make something else for the person in mind.

Ta for now - off to a parents council meeting, with 3 girls, I feel you need to give back.

Monday, October 10, 2011

I love this photo!

I really love to teach people to scrapbook and craft.  Over the last year I've been given some lovely opportunities and it's become so much fun!  There is such a sense of achievement when at the start of the night they have a bag of stash, and at the end they have a LO that they will have in their albums for years.

We came home from holidays on Wednesday and on the Thursday I taught this class.  The papers were My Minds Eye, Lost and Found 2, Breeze collection and  I have been using each collection since they came out and have a range of items made with these papers.  This new collection is as amazing as the last ones, and perfect for a home decor item that I have planned in my head.

Anyway, I had taken a lovely photo of my DD Lea recently, and it was begging to be scrapped so this is the LO that I made.


These papers are very fussy, stunning, but hard to add much to without going overboard, so I went easy on it and tried to keep the LO clean and simple(ish!).  From this angle you can't see much, but the LO is full of dimension, each layer is on foam dots and edges inked for effect.  I have a mild obsession is little flags at moment and these little cut offs from the end of the patterned paper are put to good use as these little edge embellishments for the side of the journalling block.  Yet again I have left the journalling block blank as I find it hard to write the right words, and feel that if I write on it now, I will change my mind in a few weeks and feel foolish about what is now written and cannot be changed.


The bonus to the class I taught, was that there was sufficient leftovers to make a card, and this is what I came up with.   The little toothpick flags are everywhere at the moment and this was the perfect opportunity to have a go too!


I have a lot of things that I have not shown here on the blog that I will keep adding over the next few days and am working on a' hush hush' DT project that made me smile so big when I got the news, so as of this moment I have just finished it, and waiting for daylight to photograph it before I can email it to the  DT co-ordinator.  Fun fun fun, but hopefully it will be good enough and I might be asked again!!!!

Tuesday, October 4, 2011

Back at long last.....

We are home and all back to normal after our holidays.  The bags have been unpacked and all put away, the washing done (ironing is a work in progress!!) and happy to be home and all safe and sound. (More on the holiday soon!)   My DD Caoimhe is getting ready for her school trip to Germany for 5 days tomorrow and has to be in the airport for 4.30am!  OMG what an un-godly hour to have to get up!

ITh day after I came home, the postie delivered a lovely box from Handmade Hannah!  Her stunning Christmas kit, and OMG I was still in getting sorted mode, but my head was spinning with what to do with it.  Initially I was going to do a minibook as they are so much fun, and how good would it to have one ready to go for this Christmas, but as I did'nt get much scrappy time till Sunday night (silly jet lag had me falling asleep on the couch every evening!), I got to see what Hannah and Katherine did with their kits, and as they both made minibooks I deceided to try and do something else!

So after minibooks, my next favourite thing is Bunting!  OMG I just love it so much and I did'nt have one that I had made for Christmas yet, so I decided to give it a go!


For my Be Merry Project, I used the kraft card as a base, cut the lovely My Minds Eye 6x6 paper pad, and went to town on the embellishments.  The title was cut on my cricut and the only thing not in the kit was the glitter that I used on the title, but when it was finished I hated it, so in desparation I phoned around to see if anyone had any Red glitter card and having no patience to wait, I then played a little and came up with the clever idea to paint the title (after already sticking it down!! Dhhh!) with my Twinkling H2O's!  Viola!  The title pops, the bunting looks better and I can relax!

Lots of use of my border punches, sewing machine, some glossy accents on the Y flag on the little lights.  I used lot's of dimension on this project using foam pads and layers of accents.  It looks lovely in my front room on the fire place and also in the kitchen.


So hopefully its better late than never!  Sorry for taking so long to post girls, but jet lag just sapped my energy!  Love this project and it may stay where it is till Christmas and I think it's fab!

Loads more left in the kit and I may have an inkling of an idea for the rest of the kit!

Ta M

Sunday, September 25, 2011

Wedding Card 2

So hopefully Mr. Blogger played nice and the first Wedding Card went up on the blog yesterday and you are reading the second one today!

My crafting Mojo was on overdrive when I made these cards and they just both fell into place.   This does not happen all the time, sometimes I takes a hike and can be found nowhere.

Card Front - Closed

Simple Flower embellished with cheap Cameo Earring


Indie of card opened up - money goes inside on left

Back of Card
My version of a Wedding Cake!
The card also fell into place, a simple idea and then embellished with Crate Paper Portrait collection (from Handmade  Hannah - go visit her fab boutique shop!!  I recently found a few packs of Cameo earrings and have been having fun adding them to my cards and LO's.

I hope you like this card - It is much nicer in real life! - Held closed with some velcro dots and has a fab texture to the paper.

Ta M